A 3-2-1(-1-0) Backup Plan for Your Synology NAS
November 3, 2024 - Reading time: 43 minutes |  Download PDF
It’s late at night and Raul is frantic. He’s desperately searching for an important electronic document he needs for work. He knows it’s on his NAS somewhere, but he can’t remember where he saved it. His frown deepens as he opens folder after folder, not finding what he needs. Then his blood runs cold as he remembers deleting a swath of “unneeded” files last week as part of his annual Spring cleaning. And he has no recent backup. He’d been meaning to back up his NAS, but he kept telling himself he’d do it later.
Raul wakes in a cold sweat. It was all a bad dream. Whew! To reassure himself, and vowing to back up his data right now, Raul gets up and boots his computer. But he realizes all is not well as the computer finishes booting:
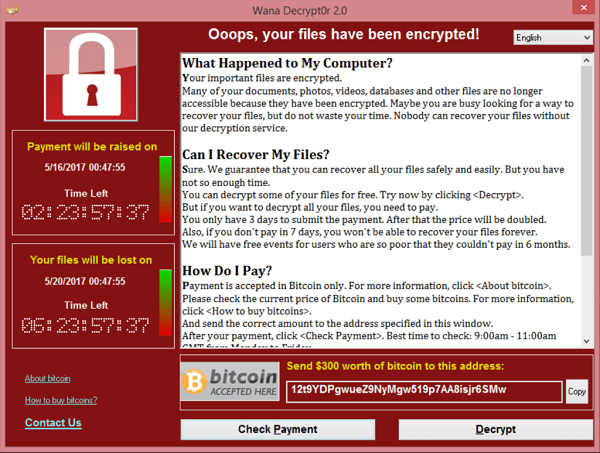 From Wikipedia (https://en.wikipedia.org/wiki/File:Wana_Decrypt0r_screenshot.png)
For Raul, the nightmare has just begun.
This is a long three-part article that outlines how to implement an effective 3-2-1-(1-0) backup plan for your Synology NAS. I recommend you read the entire article, but if you're just looking for something in particular, jump to the part your need:
- Part 1: Why a strong 3-2-1-1-0 backup strategy is a best practice for your data
- Part 2: How to create a local backup for your Synology NAS using Hyperbackup
- Part 3: How to add an S3-compatible cloud backup for your Synology NAS and a comparison of popular cloud storage services.
Part 1: You Need a Backup Plan
Whether you’re a home user that only keeps family photos and videos on your NAS or a small business that uses it to store critical business data, you need an effective backup plan to protect your precious data. Fortunately, your Synology NAS has powerful built-in tools that you can use to set up and automate an effective backup plan with minimal technical knowledge or cost.
Unfortunately, though, information you can find in online forums, while often useful, is sometimes inappropriate or even dangerous when unknowledgeable users repeat outdated or incorrect information without context. For example, the simple “3-2-1” backup plan, often mentioned online by random internet strangers, is a good start, but it is considered outdated by today’s technology experts. This article will explain how you can implement an effective, modern plan to backup and secure the data on your Synology NAS.
“...the simple ‘3-2-1’ backup plan, often mentioned online by random internet strangers, is a good start, but it is considered outdated by today’s technology experts.”
3-2-1, Backup!
Consider some of the reasons you might be out of luck if you don’t have a good backup plan. You might even recognize some of these from your own experiences!
- You accidentally deleted or over-wrote an important document (We’ve all done it, and more often than we like to admit!)
- You made major changes to a file, but now you want to revert back to the original version
- A hard drive failed (All drives fail eventually. The average lifespan of a spinning disk drive is 3-5 years; the average lifespan of a SSD is 5-7 years.)
- A power-outage at an inopportune time corrupted a document you were working on
- There was a minor catastrophe involving pets, small children, or clumsy handling
- You deleted photos from your phone, not realizing that this would also delete them from your synced storage
- A burglar helped themselves to your NAS
- A fire, flood, or other natural disaster damaged your equipment
- A hacker, angry ex, or clueless friend deleted all your photos
- Ransomware encrypted all your files
Notice that different types of threats to your data need different types of backup strategy. A RAID mirror (which is not a backup at all) may protect against hard drive failure, but it won’t help with any of the other data disasters; a backup on an external drive you keep in a desk drawer will protect against accidental deletion, but it may not be of much use in the case of theft or natural disaster.
The 3-2-1 Backup Plan
The 3-2-1 backup plan, which earned its catchy name in early-2010’s online forums, is pretty simple in principle. It suggests that you should, at a minimum, have:
- Three copies of your important data, meaning one active copy on your device and two backups…
- On two different media, meaning two different devices or storage media (external hard drive, tape backup, CD/DVD, cloud backup, etc.)...
- With one copy kept in a different location, traditionally on off-site physical media but today usually in cloud storage.
With this plan, you keep a local backup handy (on an external drive or a second NAS, for example) for situations when you need to quickly restore files and you keep an “emergency” backup somewhere else for situations where the local backup is damaged, corrupted, stolen, or encrypted by malware.
But 3-2-1 May Not Be Enough
Historically, if a home user kept an off-site backup at all, it would be stored on physical media (such as external hard drives, CD/DVD copies, or even tape archives) at a different location: in a storage locker, at work, at a friend’s house, etc. Today, though, it is far more common to use cloud storage or network mounts for off-site storage. And it is this change in the technology landscape that has weakened the 3-2-1 backup plan.
What has changed in just the past few years? Ransomware. Ransomware has changed our entire outlook about what constitutes a safe backup plan
Ransomware
Ransomware has been around since at least the late 1980’s, but it didn’t become common until the mid-2010’s, largely because of then-new Bitcoin. With the introduction of Bitcoin and other cryptocurrencies, cybercriminals had a brand new way of demanding anonymous payments from hapless victims. And ransomware flourished.
Ransomware is a type of malware that infects your computer and silently encrypts data on your storage devices. It doesn’t normally delete the data, it just makes it unreadable by you or anyone else without a decryption key. The villains then offer to decrypt your files for you, but only if you pay a ransom using Bitcoin or some other cryptocurrency. There is usually no way to recover from a successful ransomware attack other than to pay the villains what they ask or to restore from backup. But the more insidious ransomware actively seeks out and deletes any backups it can find.
This is why a 3-2-1 backup plan using snapshots, always-connected cloud storage, or network mounts for the offsite backup may not be good enough. If a ransomware can find and access the network backup, it can delete or corrupt it. In response to the ever-growing threat of ransomware, experts now recommend a more robust backup strategy.
3-2-1-1-0, Oh My!
“3-2-1-1-0” doesn’t roll off the tongue as easily as “3-2-1,” but it’s a better backup plan. It’s a slight modification to the simple 3-2-1 plan that limits our off-site backup to methods that are protected. Using this strategy, you should have:
- Three copies of your data, just as with the 3-2-1 backup plan…
- On two different media, just as with the 3-2-1 backup plan…
- With one copy stored at a different location (such as online)...
- Where one copy is “air-gapped” from your device…
“Air-gapped” here simply means that if ransomware infects your computer, it doesn’t have access to the backup. - With zero errors or changes (such as might be introduced by ransomware)
Sounds complicated doesn’t it? Happily, it doesn’t have to be. If you’re already using a 3-2-1 backup plan with secure API-based cloud storage, for example, you’re already protected and you can stop reading now. If not, you should consider improving your backup strategy. For example, these 3-2-1 backup plans do not follow best practices:
- A 3-2-1 plan where the only off-site backup is stored to an always-connected network mount or second NAS and does not require an additional password or key is not air-gapped. (This practice is fine for primary backups, but should be combined with a secure cloud backup.)
- A 3-2-1 plan where a home user has to manually mount, unmount, rotate, or deliver the only off-site backup introduces the chance of human error. (This practice could be combined with an automated S3 cloud backup to create a 4-3-2-1-0 backup plan, though.)
The rest of this article will explain how you can easily implement a 3-2-1-1-0 backup plan on your Synology NAS using Synology's built-in Hyperbackup software and employing an online S3-compatible storage provider such as BackBlaze B2 or Synology C2.
Backing Up Your Synology NAS
To implement a robust 3-2-1-1-0 backup strategy on your Synology NAS, you can use Hyperbackup to automate 2 separate backup tasks: 1) a local backup to serve as your primary easy-to-access backup, and 2) an air-gapped cloud backup as your off-site fallback. When you use Hyperbackup with versioning, your data is stored as immutable (unchangeable) binary large objects -- old versions of your data are retained for a while alongside newer versions. So, even if your files become damaged or encrypted, it will be possible to restore the older versions as long as the backup itself has not been tampered with. And having an air-gapped cloud backup prevents such tampering by ransomware.
When you use Hyperbackup with versioning...old versions of your data are retained for a while alongside newer versions. So, even if your files become damaged or encrypted, it will be possible to restore older versions as long as the backup itself has not been tampered with.
Both the local and off-site backup will use Hyperback’s incremental backup feature to store multiple versions using deduplication to minimize disk space required. This is not the only way to implement a 3-2-1-1-0 strategy, but is straightforward and easy for most users to set up.
To begin, make sure Hyperbackup is installed and your local backup drive is connected. If Hyperbackup is not yet installed, open Package Center on your NAS, search for Hyperbackup, and install it. If you will use a second Synology NAS as your local backup target, then you should also install Hyperbackup Vault on the backup NAS.
Part 2: Your Local Backup
Most users will use storage directly connected to their NAS for their primary backup. This could be an external USB drive, an external drive in a cradle, an unused drive in your NAS, a network mount, or any other storage device (remember Zip Drives?). It just needs to be large enough to store the backup. While it is technically safer to disconnect the backup storage when not in use, most users will leave the device always-connected so that backups can be automated. (For bonus points, you can configure a scheduled task to automatically mount the device, perform the backup, then unmount it, but that is beyond the scope of this article.)
![]()
Sidebar: RAID is not a backup. If you have more than one drive in your NAS, you may have RAID (redundant array of inexpensive disks) mirroring set up. If so, you may be thinking to yourself, “I already have a local backup.” You should not think of RAID like this.
A RAID array keeps two or more copies of your data on separate discs and offers very good protection against single-drive failure. When one drive fails, the redundancy ensures your data is seamlessly available from the other drive while you replace the damaged one. It may also speed up disk read times since the data can be simultaneously read from two drives at once. This is not a backup solution, though. RAID is very good at protecting against data loss when a drive fails, but it will not protect against accidental deletion, ransomware, or most other data loss.
Similarly, local “snapshots” and live sync programs are a grey area. Clever marketing has made these products sound much more robust and ransomware-safe than they actually are. By default, some only save data to the local NAS and/or don't support versioning, making them unsuitable as a backup solution. If you are using one that saves multiple versions to an external location, though, they will do as a primary backup. You will still need an additional cloud backup to complete your 3-2-1-1-0 backup plan.
Hyperbackup Instructions
These instructions outline how to set up your main incremental backup task to an always-connected external drive or network mount. It will satisfy the “2 media” part of the 3-2-1 backup strategy. Before beginning, make sure your backup target is ready:
- If you are using an external drive as your target (most likely), make sure the drive is connected and properly formatted. You should be able to see it in File Station. Ideally, the drive should be empty, but this is not strictly required.
- If you are using a second Synology NAS as your target, make sure it is reachable by its IP address and that Hyperbackup Vault is installed.
- If you are using a CIFS (Samba) or NFS network mount as your target, make sure that it is mounted as read/write and is visible in File Station.
In Hyperbackup, click the + symbol to start configuring a new backup job. Then configure your new backup by following these steps:
- Select “Folders and Packages” (This is the default action, but if you will use a second Synology NAS as your local backup target, you can choose “Entire System” instead.)
- On the next screen, choose “Local Shared Folder or USB.” (Or choose “Remote NAS Device” if you are using a second Synology NAS as your local backup target.)
- When asked about versioning, select “Multiple Versions”
- For Backup Destination Settings, choose your external drive or network mount from the drop-down. Do not choose a local shared folder on your NAS. You can then choose a directory name for your backup, or just accept the default.
- On the next screen, tick the box by each of the folders you want to back up. You can click the arrow next to a folder name to select or deselect subfolders.
- The next screen lets you choose whether to include Synology app configurations with this backup. Select each of the apps that you actually use, but there’s no reason to select apps you don’t use.
- On the next screen, you’ll configure important options for the backup:
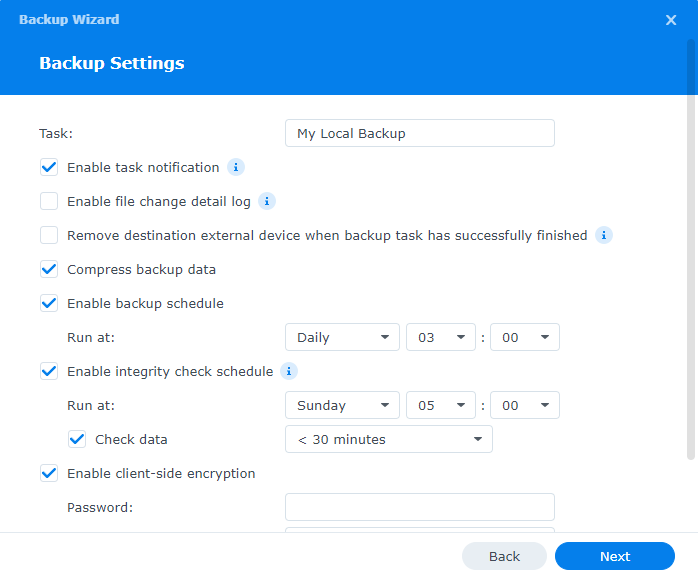
- Choose a name for the backup task
- Tick “Enable task notification” if you want to receive DSM notifications for this task. If you enable notifications, you can configure which events trigger notifications in Control Panel -> Notification -> Rules
- If you want Hyperbackup to create a log of every file that was added, removed, or modified, tick “Enable file change detail log.” This is not normally necessary.
- I do not recommend that you tick “Remove destination external device when backup task has successfully finished” unless you also have a task to automatically re-mount the target before each backup. Otherwise, no matter how good your intentions are, there will be times when you forget or are unable to reconnect your backup target. Automating the backup without the need for human intervention is key to a successful backup strategy.
- Tick “Compress backup data” so that your backups take less space unless most of the files you are backing up are already compressed (zipped archives, photos, videos, etc.) Compression will make each backup take a little longer, but the space savings are usually worth it.
- Choose a backup schedule that suits your needs. Most people will back up daily. Remember that incremental backups use deduplication so there will be no significant difference in the amount of disk space used regardless of how often the backup is performed – 14 daily backups won’t take much more space than 2 weekly backups, for example.
- Backup integrity checks are optional, but recommended periodically. The integrity check will compare the data on your backup target to the source data on your NAS and will also verify the backup’s index structure. While an integrity check is very time-consuming, it can help identify bad sectors or corrupted data in your backup. If you choose to perform integrity checks (recommended), you can limit how long the integrity check is allowed to run.
- If you want to encrypt the data in your backup, tick “Enable client-side encryption” and choose a strong password. Do not lose this password as it is required to restore the backup. Note that if you are including encrypted shared folders in your backup, you must enable this option if you want the backup to also encrypt those folders.
- The final screen lets you configure the versioning (rotation) schedule. The “Max number of kept versions” setting is the total number of backups that Hyperbackup will keep before it starts deleting old backups to make room for new ones. The retention policy settings define which backups will be kept.
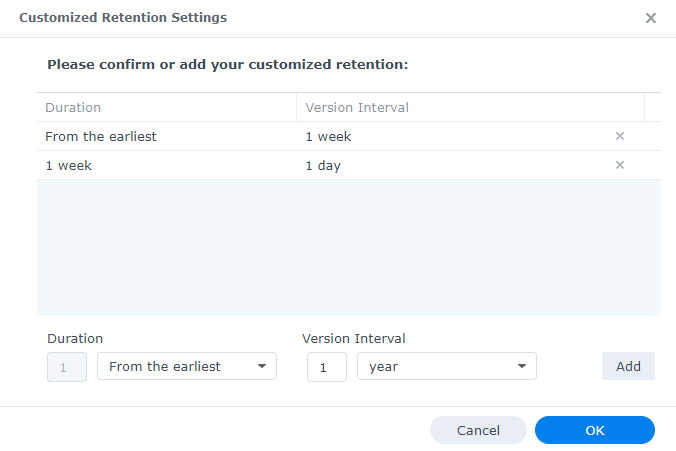
For example, if you just want to keep the last week of daily backups, you can choose “From the earliest versions” with “8” kept versions (the current backup and daily backups going back 7 days):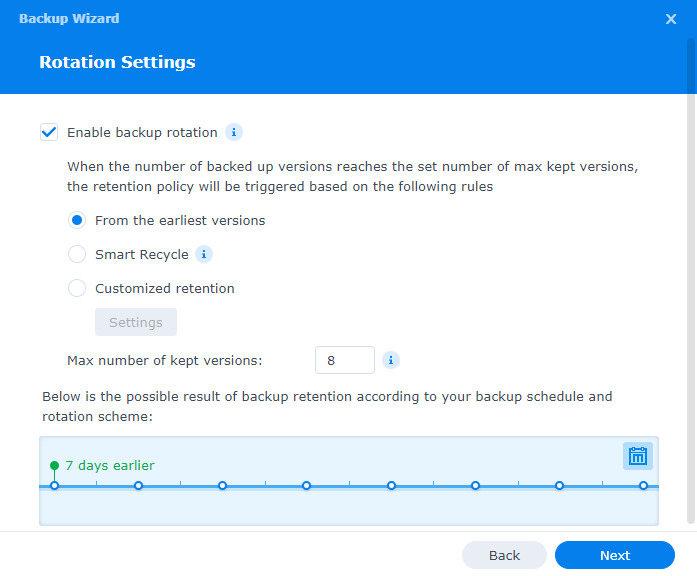 If you want a longer retention time, but you don’t want dozens of versions, you can use “Customized retention” settings. To keep daily backups for the past week and then weekly backups going back for two months, for example, you would choose 15 kept versions and set these retention rules:
- Review the summary and click “Done” to finalize the backup task. If you have the time, go ahead and start the initial backup when prompted by Hyperbackup. This first backup can take quite a long time, depending on how much data is being backed up. Expect it to take several hours per terabyte. Subsequent incremental backups will be much, much faster since it only adds new data to the existing backup pool and deletes obsolete data from backups that rotate out.
Part 3: Your Off-Site Backup
To implement a 3-2-1-1-0 backup strategy, your off-site backup needs to be logically isolated from your source data. Of course, the simplest way of doing this is to make additional incremental backups on a separate external drive and physically carry it to some other storage location. This plan isn’t suitable for most home users, though. No matter how well-meaning a user is, there will be times when they forget or are unable to make the backup or they postpone transporting it to storage. There is also a danger of damaging the media during transport or storage, violating the “zero errors” part of our strategy.
A better, automated, error-free solution is to use S3-compatible (object-based) cloud storage through an API for your off-site backup. Backups made this way are logically separated from your NAS and stored as encrypted immutable binary large objects on a provider’s cloud servers. The backup is never actually mounted on your NAS, so it is not easily-accessible by ransomware should a computer attached to your NAS get infected. Fortunately, Hyperbackup has native support for S3 storage solutions. The downside is that you will probably need to pay for such a storage service, though prices are quite reasonable these days.
S3 Storage Providers
There are several companies that offer low-cost S3 cloud storage for home users, some more reputable and transparent with their pricing than others. Pricing models vary and, unfortunately, some companies have “hidden costs” with their service. Costs to be aware of include:
- Storage fees. The price you pay for the actual storage, per terabyte (or gigabyte) per month. Some storage services round up to the nearest terabyte; some do not (see below).
- Egress fees. The price you pay when you need to restore data from a cloud backup. Some enterprise-level providers charge very high egress fees, but each of the companies I mention below charge essentially no egress fees to restore a normal backup.
- API call fees. The price you pay each time you upload, download, or query your cloud storage. Each of the companies I mention below has no API fees for normal use.
- Upload fees, versioning fees, support fees, bandwidth fees, and minimum storage length. None of the examples I mention below have these fees or requirements.
Pay-As-You-Go vs. Prepaid Subscription Model
Each of these three options offer a variety of pricing plans, but they can broadly be be classified as pay-as-you-go or prepaid subscription:
- Pay-as-you-go plans charge you only for the storage you actually use, usually rounded up to the nearest gigabyte, and usually in arrears (at the end of a month, based on the previous month’s usage).
- Prepaid subscription plans charge you a discounted rate up-front for a fixed amount of storage. While the per-terabyte cost is less, you are charged the full amount in advance whether you actually use all the paid-for storage or not, even when your storage needs change during the subscription period.
If you have a good handle on exactly how much backup storage you will need over the course of a year, then a yearly subscription plan may be most cost-efficient for you. Otherwise, a pay-as-you-go plan will offer the smoothest experience.
S3 Storage Providers
Three of the most popular low-cost S3 storage solutions for home users are Backblaze B2, Synology C2, and iDrive e2. Each of these three companies have similar pricing and policies, which are summarized below, and each offers a small amount of free storage. (I am not affiliated in any way with any of these companies. I am including them because they are low-cost and popular with home users.)
| Free storage | 10 GB | 15 GB | 10 GB |
| Pay-as-you-go | $6/TB/month | N/A | $5/TB/month |
| To the nearest | GB/hour | TB, prepaid | GB (1 TB minimum) |
| Subscription | N/A (for home users) | $6.99/TB/month $69.99/TB/year |
$49.50/TB/year* |
| Egress fees | Free for 3x monthly storage, then $0.01/GB | Free for 1x monthly storage, then $0.01/GB | Free for 3x monthly storage, then $0.01/GB |
| API call fees | Free | Free | Free |
| Pricing page | |||
| * iDrive offers a 50% discount for the first year of a yearly subscription | |||
Backblaze B2
Backblaze is well-established in the data storage industry and is probably the best-known player. Their no-nonsense pay-as-you-go pricing is attractive: you pay only for the storage you use, to the nearest gigabyte/hour, with no minimum charge. For example, if you use only an average of 250 GB across a month, you are billed only $1.50 for that month. With very generous free egress and API call allocations, they are a good fit for off-site backups.
One caveat for Backblaze, though, is that their TrustPilot ratings are pretty scary, with 66% of the reviews (at the time of this article) rating Backblaze as 1-star. Looking over the reviews, though, it seems that most or all of the low ratings are related to Backblaze’s personal computer mirroring product rather than their S3 object storage. Still, it pays to be informed.
Synology C2
Synology is a newer entrant in the data storage arena. Their pricing is higher than the other two companies, but in the same ballpark. Be aware, though, that Synology pushes their subscription-based “Personal Backup” hard on their website and tries to direct you away from the more flexible object-based storage. Also, Synology’s object lock with versioning seems as though it may be compatible with Hyperbackup.
However, unlike the other two companies, Synology requires you to estimate and pre-purchase a fixed amount of storage per month or year. If you overestimate, you still pay for the unused storage; if you underestimate, future backups are blocked until you upgrade your subscription. Although they claim to have pay-as-you-go pricing, this policy is actually a pre-paid subscription model whether you pay by the month or by the year.
iDrive e2
iDrive is the most inexpensive of the three offerings covered here. Their pay-as-you model is similar to that of Backblaze, but it does have a 1 TB ($5.00) minimum per month. The iDrive website, though, is hard to navigate and has aggressive off-putting marketing for their subscription-based plans. They seem to intentionally hide information about their e2 object storage service, directing you instead to their live sync products, which are not appropriate 3-2-1-1-0 backups. Nonetheless, iDrive’s low pricing and pay-as-you-go model make their e2 storage service an attractive option if you trust the company.
So Which Service Should You Use?
Ultimately, any of the three options will suit most home users as an off-site backup solution. There is no wrong choice, but of the three I tested, I felt most comfortable with Backblaze, both as a service and as a company, despite their low TrustPilot reviews. I was turned-off by Synology’s misleading pricing policies and, based on Synology’s past business practices, I expect them to aggressively increase their already-higher prices as their user base grows. For iDrive, I was unimpressed with their clunky interface, aggressive marketing, and poorly-designed website. Still, the choice is yours. Each company offers a free plan with 10-15 GB of storage that does not require a payment method so, if you’re the methodical sort, you can test all three before making a choice.
Set Up An S3 Bucket and Access Key
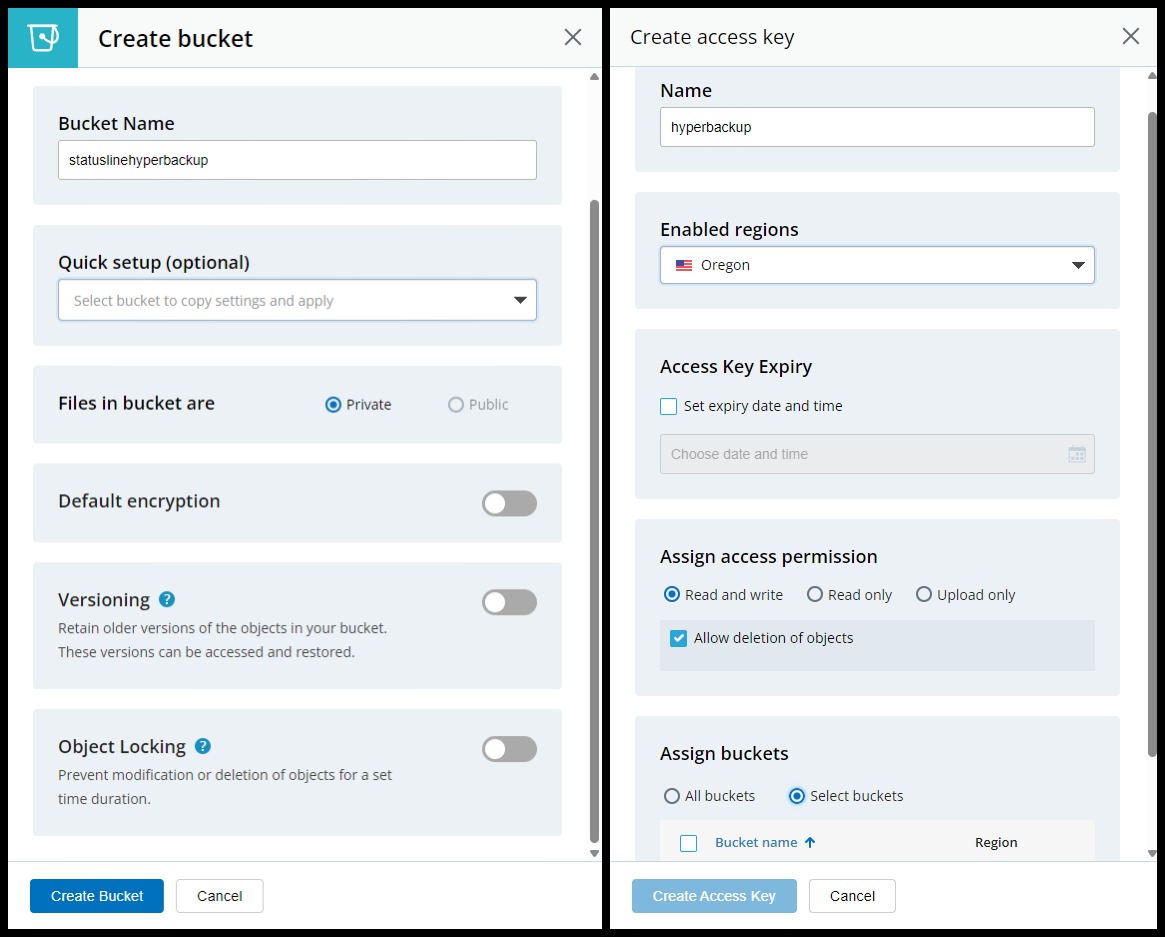
Data in S3 object storage is stored in virtual containers called buckets. Regardless of which storage provider you use, you can set up as many buckets as you like and create unique access keys, retention rules, and permissions for each. For this article, though, we’ll use just one bucket and one access key for our off-site backup.
Specific instructions for creating and configuring data buckets and access keys vary slightly between S3 providers, but the configuration options are essentially the same for each. When you create a bucket you should choose these options, if available (not all options are given for all storage providers):
- Give the bucket a unique name, using only lowercase letters. If your provider allows bucket sharing, you may have to try a few names before you find one that hasn’t been taken by another user.
- Private or public bucket: Private
This option would allow you to share data with other users, which is not what you want for your off-site backup. - Server-side encryption: Disable
We will use client-side encryption and transfer encryption in Hyperbackup to encrypt our data. Turning on server-side encryption would be redundant and wasteful. - Object lock: Disable
Object lock is a feature that makes a bucket immutable (unchangeable by anyone, including you). While this would help ensure the “zero errors” part of the 3-2-1-1-0 strategy, it will break Hyperbackup’s ability to maintain backups. Hyperbackup’s data is already stored as immutable binary large objects, so server-side object lock is not really necessary anyway. - Versioning: Disable
We will use Hyperbackup’s built-in versioning, so versioning by the provider is unnecessary. You can turn it on for added protection if you like, but be aware that it will take additional storage space.
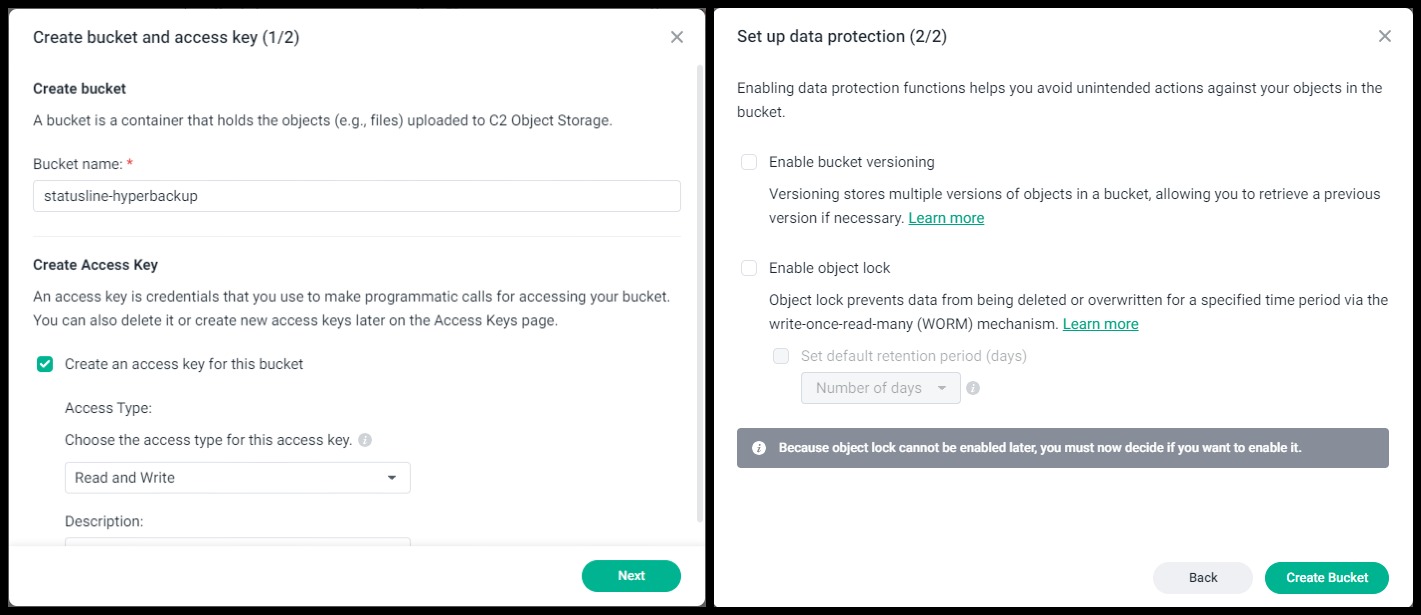
Synology C2 Options Setup (Click to enlarge)
Once the bucket is created, turn off versioning if it is enabled (“Lifecycle settings” if you are using Backblaze) and take note of the endpoint. This is the name of the server that Hyperbackup will contact to save your off-site backup.
Next, set up an access key that Hyperbackup will use to access the bucket you just created. It is good practice to create a separate access key for each bucket and each application that will access it. In our case, only Hyperbackup will access the bucket, so we only need to create one access key. When creating the key, use these options, if available:
- Allow access: Only the off-site backup bucket
- Type of access: Read and Write
- Allow list of bucket names: Allow
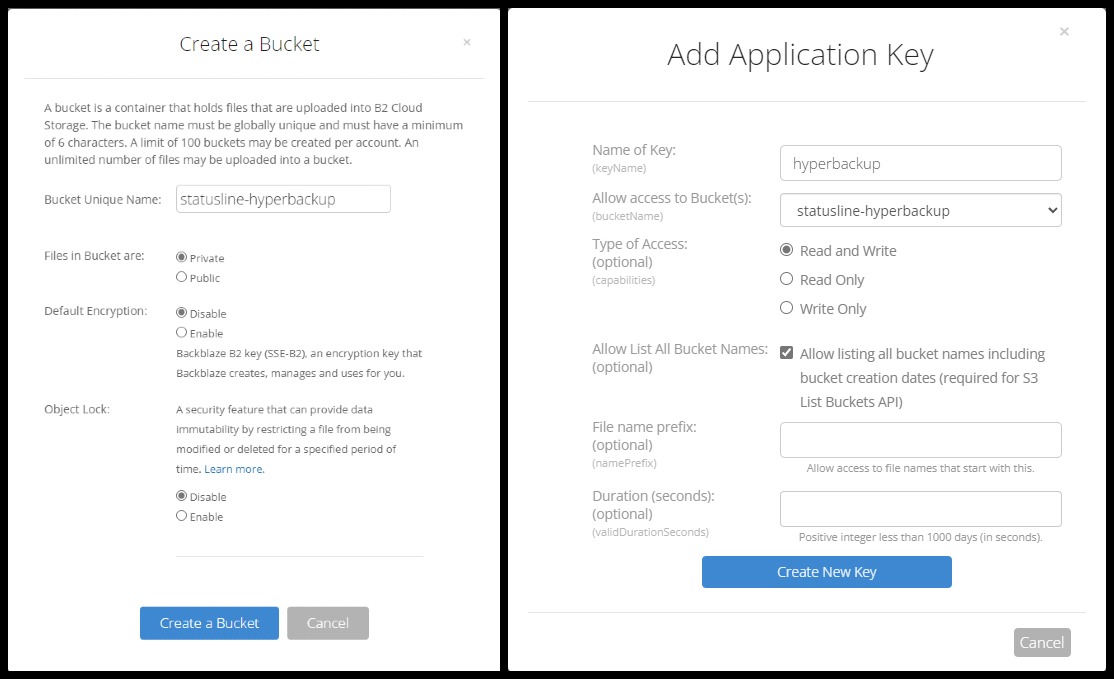 Backblaze B2 Setup Options (Click to enlarge)
Once you create the key, you will be given a key ID and a secret key. Save the secret key someplace safe, at least until after you have set up the Hyperbackup task. If you lose the secret key there is no way to recover it! In that case, you will need to delete the old key and create a new one.
iDrive e2 Options Settings (Click to enlarge)
Hyperbackup Instructions
Setting up the Hyperbackup task for your off-site backup is very similar to the steps you followed for your local backup. Open Hyperbackup and click the + symbol to create a new backup task.
- Select “Folders and Packages”
- On the next screen, scroll down and choose “S3 Storage” (Note: If you are using Synology C2 Object Storage, do not choose the “Synology C2 Storage” at the top of the page – that is a different paid product with a different pricing model.)
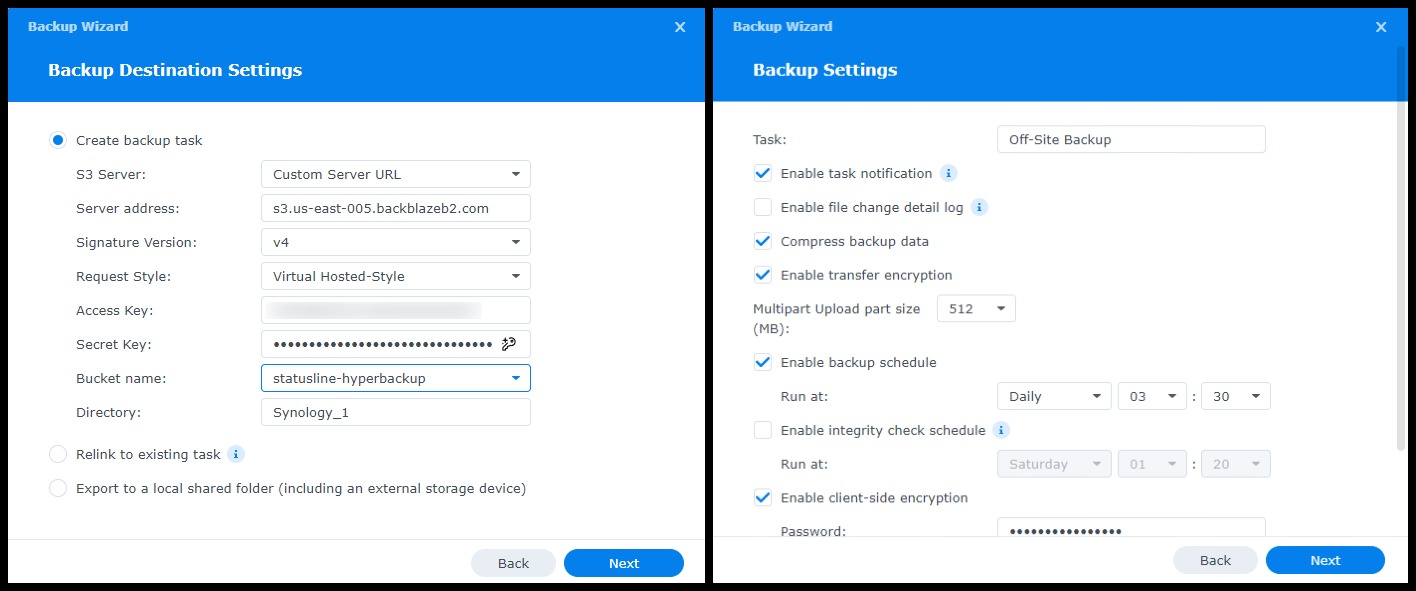
- On the following screen, populate the form with your S3 storage provider details:
- S3 Server: Custom Server URL
- Server address: Copy the endpoint from your chosen storage provider
- Signature version: v4
- (v4 is appropriate for Synology, Backblaze, and iDrive. If you use a different provider and have problems, you can try v2 here.)
- Request style: Virtual-Hosted Style
- Access key: Copy the KeyID for the access key you created above
- Secret key: Copy the secret key for the access key you create above (This is the key I told you not to lose. If you lost it anyway, you’ll need to create a new one.)
- Bucket name: Choose the bucket you created above from the pull-down list
- If you get an error when you click the pull-down list, then double-check the values you entered for Server address, Signature version, Access key, and Secret key. One or more of those values are incorrect.
- Directory: You can enter a directory name or accept the default
Hyperbackup S3 Backup Settings (Click to enlarge) - Not applicable
- Select the folders or subfolders you want to back up to cloud storage and click Next.
- Select the application settings you want to back up to cloud storage and click Next.
- Backup settings are almost identical to your local backup settings, but you may want to make some adjustments:
- Be sure “Enable transfer encryption” is checked so that your backup is sent securely and not susceptible to man-in-the-middle interception
- You can adjust the backup frequency and scheduling to suit your needs. Since none of the cloud storage providers discussed above charge for uploads, there is no downside to using daily scheduled backups. You may want to schedule the backups for a different time as your local backup, but if they are scheduled at the same time, Hyperbackup will just queue one up until the other is finished.
- You can untick “Enable integrity check schedule” to save time since your storage provider is responsible for maintaining the integrity of your cloud backup.
- Be absolutely sure “Enable client-side encryption” is ticked, even if you don’t encrypt your local backup, and enter a strong password. Store this password somewhere safe since you will need it when restoring data.
- Versioning (rotation) schedule settings are set in the same way as your local backup. However, if your local backup saves a very large number of versions or saves versions for a very long time, you may want to store fewer versions for the online backup for cost reasons. I recommend storing at least weekly versions for at least 4 weeks.
- Review the select options and click “Done.” If you want, you can start your first off-site backup now. Be aware that the initial cloud backup is likely to take much longer than your initial local backup did. Future incremental backups will be much faster, depending on how much new data is being backed up.
If you’ve followed the instructions in this article, you can breathe easier! You now have a working 3-2-1-1-0 backup strategy that is robust against data loss and ransomware.
Copyright 2024 Steve Derby for The Status Line (https://www.statusline.org/)
synologybackupcloud storageransomware
🪛 📐 TOOLBOX 🔨 🔧
📬 SPF Record WizardThis is part of a maze of twisty little passages, all alike.